Crochet Ridge Stitch Tutorial
I am excited to share this stitch pattern I named the crochet ridge stitch!
I came upon the ridge stitch accidentally by messing up another pattern I was trying to figure out! So it’s a win-win!
Great Crochet Stitch to Try
See, it’s proof that good things can come from making some mistakes!
I wasn’t sure what to call this, but ridge seemed to stick in my head when looking at the pattern, so I just went with it! So, introducing the Ridge Stitch in Crochet!
This stitch would be great for an intermediate level crocheter, or higher, but if you are just starting out, give it a shot anyway! You never know!
I can’t wait for you to try this fun crochet stitch!
Happy Crocheting!
Crochet Ridge Stitch Tutorial
Skill Level: Intermediate
Materials
- NEEDED: 2 Colors of Yarn of your choice (I used cotton yarn for my sample)
- Crochet hook size determined by what yarn you are using
- Scissors to cut off the ends
- Yarn needle to weave in loose ends
Notes
- To make your design larger or smaller, chain a multiple of 4 plus 3
- The pattern is written in standard US terms.
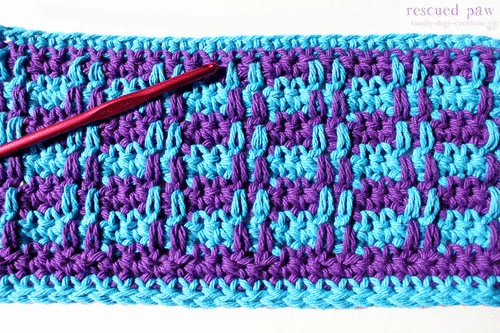
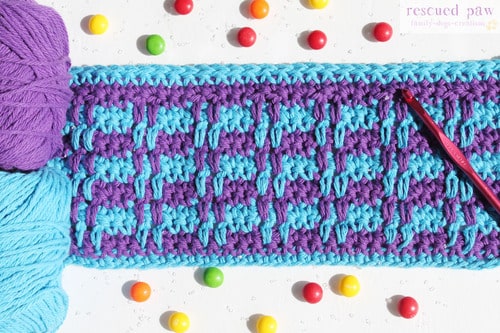
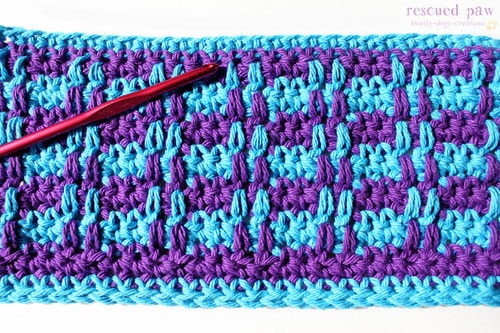
The Stitch Pattern
FOUNDATION CHAIN: With a crochet hook and your first color of yarn, Chain multiples of 4 plus 3 (I used 31 Chains on Sample)
ROW 1: Working in the back bar of your chain [tutorial here], Single Crochet in each Chain across, change your color now, chain 1, turn
ROW 2: Single Crochet in each Stitch across, chain 1, turn
ROW 3: Next Single Crochet in each Stitch across, change color to first color in the last stitch, chain 1 , turn
ROW 4: Single Crochet in first two stitches, Skip first 2 single crochets on 2 rows below, then double crochet in around each of the next 2 stitches 2 rows below, Single crochet in the next two stitches 2 rows up, Repeat this pattern until the end of row, chain 1, turn
ROW 5: Next, Single Crochet in each stitch across changing to second color at the last stitch, chain 1, turn
ROW 6: Single Crochet in first two stitches, Skip first 2 single crochets on 2 rows below, then double crochet in around each of the next 2 stitches 2 rows below, Single crochet in the next two stitches 2 rows up. Repeat this pattern until the end of row, chain 1, turn
ROW 7: Single Crochet in each stitch across changing to first color at the last stitch, chain 1, turn REPEAT UNTIL DESIRED LENGTH.
What an awesome looking pattern! Right? Now take a look at the backside and see a cool spike stitch pattern forming!